Building a Blog from a Product Designer’s Perspective
Preface
The design and development of Roominess 5.0 has finally come to an end. To be honest, I feel like this blog project has really put all the design and development knowledge I’ve learned to use, making it a pretty good practice project. So, from the perspective of a product designer, I’d like to chat with you about how to build your own blog.
This article will cover the following two parts: the complete process of taking a blog from concept to launch, and recommendations for design/development tools.
Blog Development Process
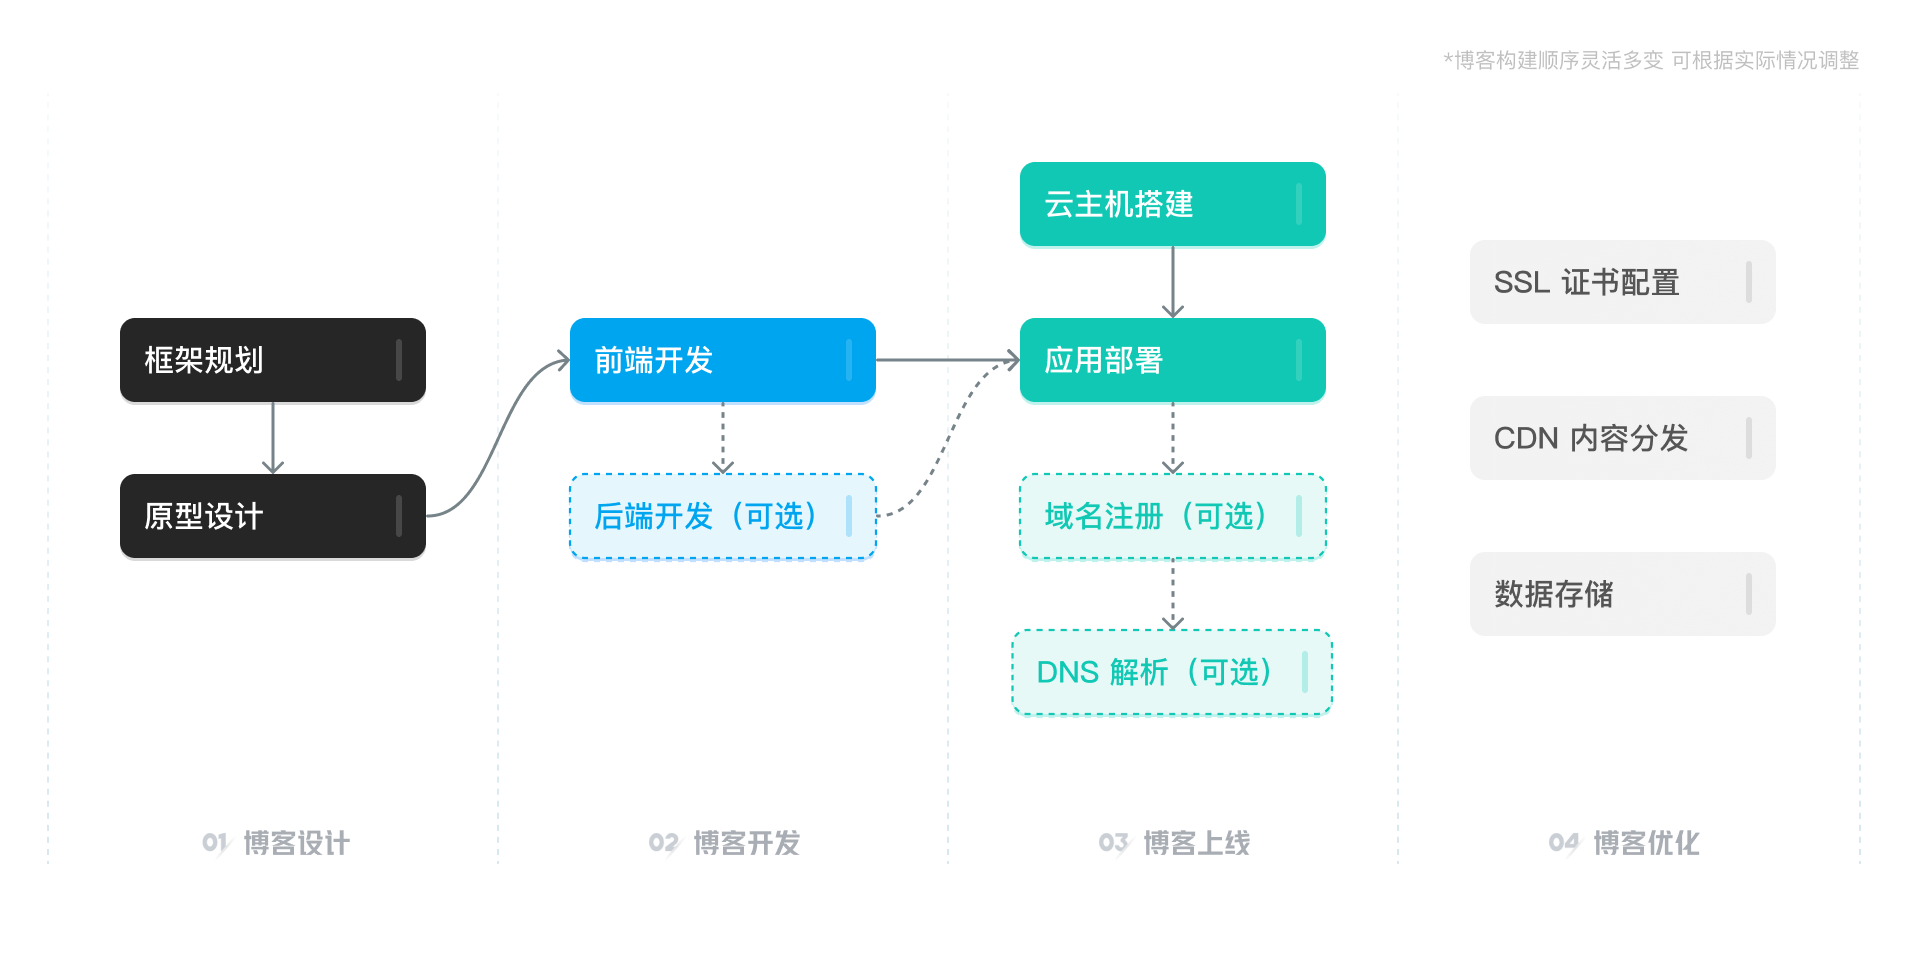
Blog development mainly includes the following major stages: planning and design, frontend and backend development, deployment and launch, and application optimization. In this section, we’ll introduce the first three parts. Website optimization will be covered later as supplementary content.
Blog development is a simplified project development process. It gives us an excellent opportunity to improve our understanding and control of an entire project.
Oh, right. One more thing before we begin: if you simply want to have your own website and don’t want to tinker with everything yourself, then “no-code” tools may be more suitable for you. You don’t need to write code or maintain servers yourself; you only need to plan, design, and pay. For example, Framer, Webflow, or you can try having AI help you build a website with Wegic.
As for me, I still prefer the traditional development and deployment approach. It gives us more room to work with, allows for a higher degree of customization, and is generally more flexible.
Planning and Design
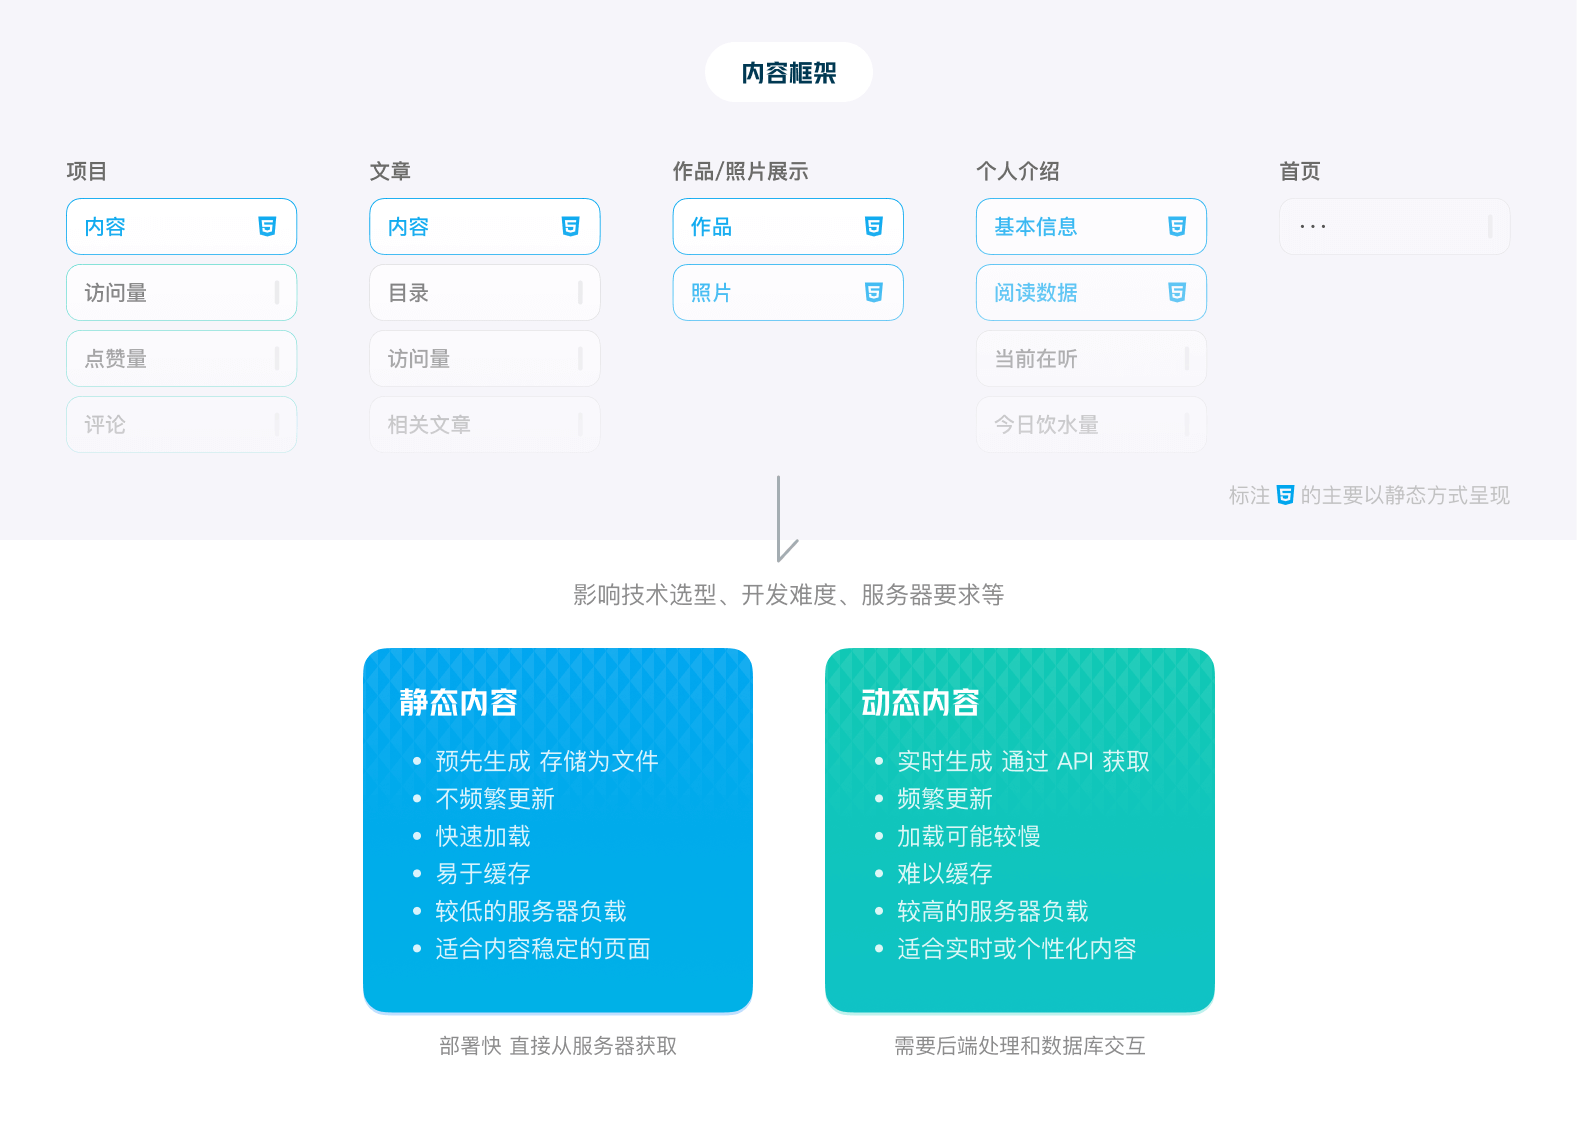
Blog planning mainly involves deciding what content the blog needs and whether that content leans more toward being static or dynamic. The distinction between static and dynamic content mainly affects the subsequent technology choices and development difficulty.
Most content, such as personal project showcases, article lists, portfolios or photo collections, personal bios, reading lists, website update logs, and so on, is relatively fixed and can be regarded as static content that does not need frequent updates.
There is also content that needs to be updated in real time, such as article views, likes, comment counts, or the music the blogger is currently listening to, today’s water intake, and so on. This dynamic content requires real-time data retrieval and can be regarded as dynamic content.
I’ve also put together a table. You can roughly look at how to distinguish static and dynamic content, as well as their impact on subsequent development.
Reading this article may help you understand static and dynamic websites: Choosing Between Static and Dynamic Websites
During the early planning stage of a project, the more thoroughly you think things through, the easier development will be later. However, the technical difficulty of developing a blog itself is very low, so even if your initial thinking isn’t comprehensive enough, the impact will be small. Don’t put too much pressure on yourself.
After the content architecture is set, you can move on to building the design specifications. For a blog, basic elements such as a color system, layout, and typography are enough. There isn’t much need for a huge design system.
I recommend first learning about frontend thinking and development methods before starting the design. This will make things much easier. The key is how to make things more systematic and modular.
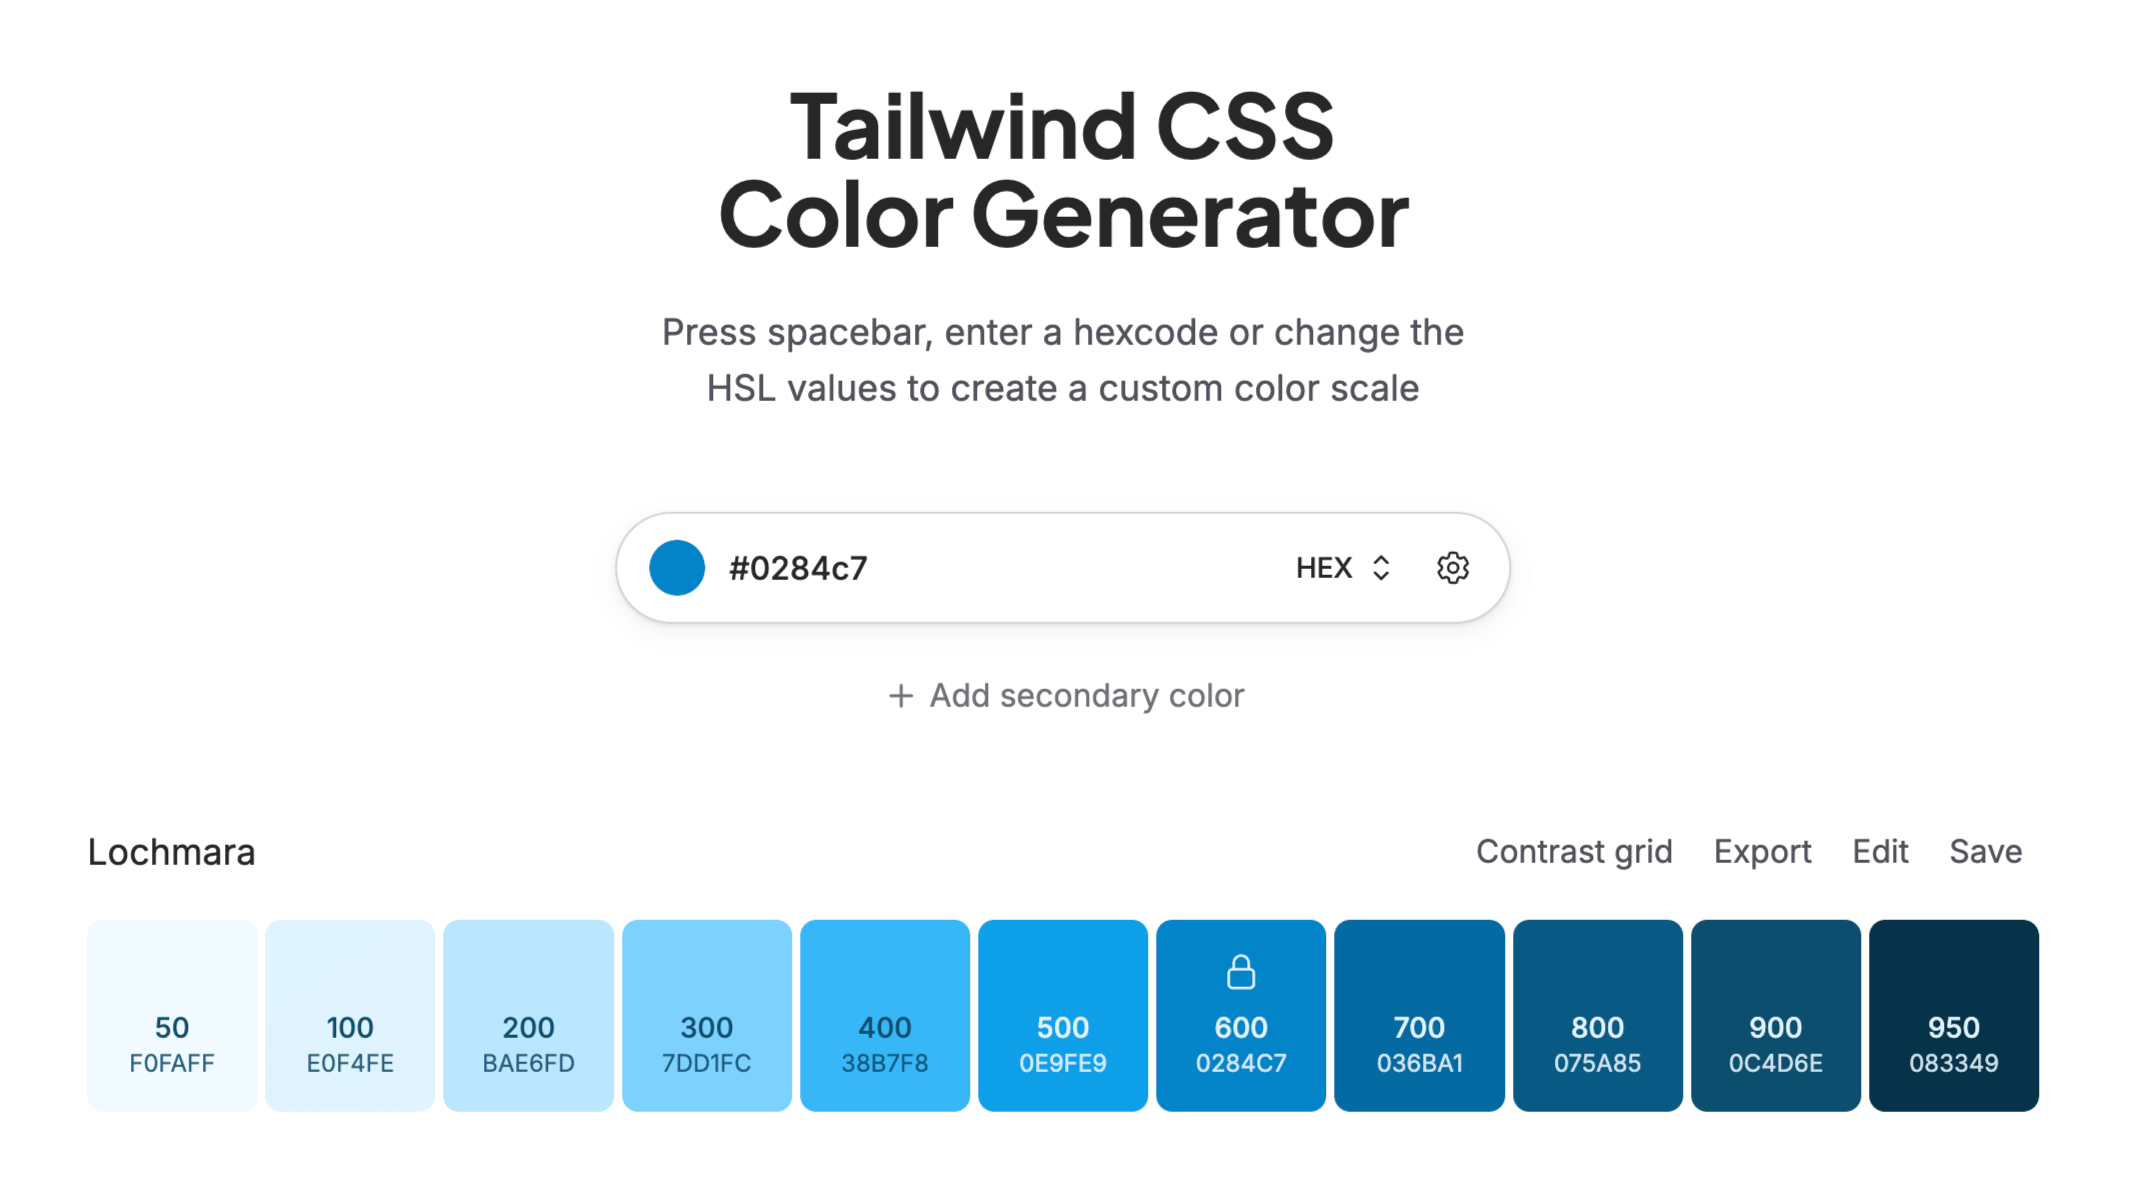
Taking the definition of a blog color system as an example:
- First choose a theme color you like,
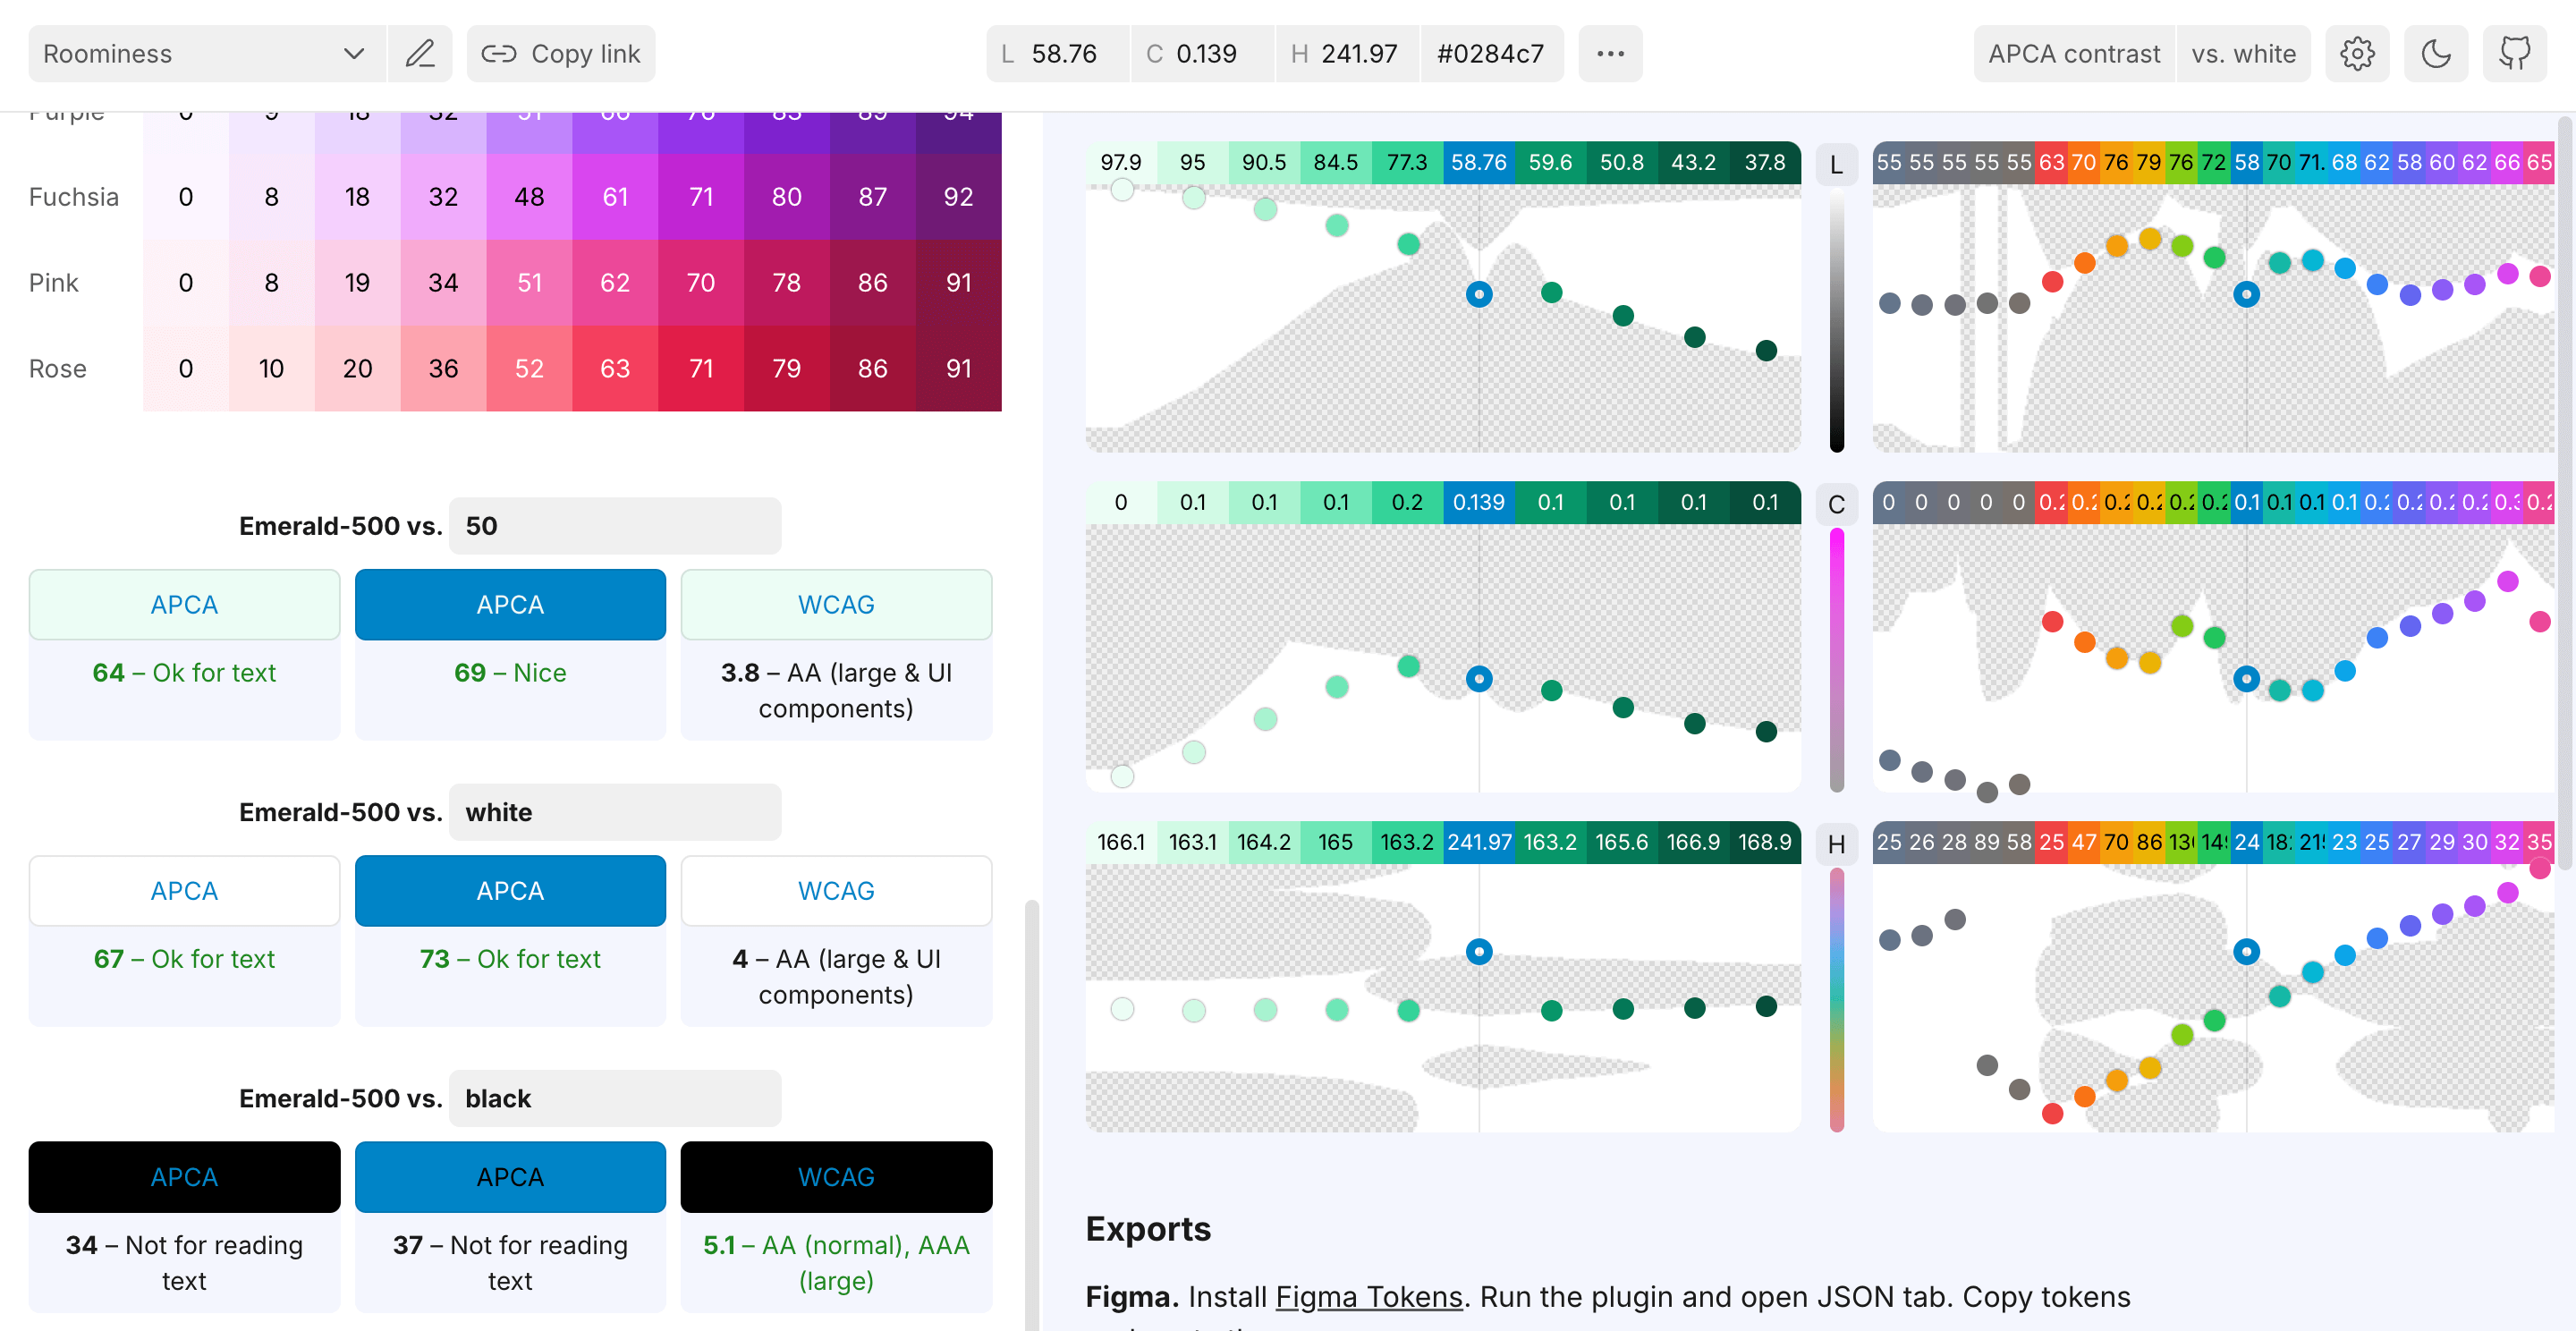
#0284C7, and use Tailwind CSS Color Generator to generate a color palette - Then use Huetone to check and adjust whether the generated palette complies with WCAG 3.0 standards
- Finally, just like Tailwind CSS theme colors, you can fine-tune it yourself based on your color sense.
- The article Designing accessible color systems may give you more systematic methods for building a color system.
On the design side, you need to define text colors and theme colors; functional colors are not used that much. If you also need to support dark mode, you’ll need to further consider how colors appear in dark mode. The layout framework should also be defined in advance. If the website isn’t particularly personalized, the positions of several functional modules usually won’t change. After defining the two parts—colors and layout—development can also begin in parallel.
Frontend and Backend Development
For the development part, I’ll mainly introduce frontend development, since I don’t know much about backend development.
Frontend Environment Setup
Taking Mac as an example, frontend development requires the following tools:
- Code editor: Visual Studio Code (VS Code): software used to write and manage code
- Runtime environment: Node.js: a platform that allows JavaScript to run on your computer
- Version control system: Git: a tool used to track and manage code changes
- Package manager: Homebrew (optional): a tool that simplifies the software installation process on Mac
The basic process is to first install a software package marketplace, then install development-related software such as Node.js, Git, and VS Code through that marketplace. Once installation is complete, you can write code in VS Code and use Node.js to build your blog. Then you can use Git to record the change history of your code, making it easier to manage.
Run the following commands in the macOS terminal to configure the frontend environment you need:
# 安装 macOS 软件包管理:brew
/bin/bash -c "$(curl -fsSL https://raw.githubusercontent.com/Homebrew/install/HEAD/install.sh)"
# 通过 brew 安装 VS Code、git
brew install --cask visual-studio-code
brew install git
# 安装 node 管理工具:nvm
curl -o- https://raw.githubusercontent.com/nvm-sh/nvm/v0.40.1/install.sh | bash
# 通过 nvm 安装长期支持的 node 版本
nvm install --lts
# (可选)安装 pnpm 软件包管理器
npm install -g pnpm
The required frontend environment is now configured. If you need to install anything extra, you can also do so through the brew software marketplace. Network issues need to be resolved on your own.
Frontend Technology Selection
The frontend environment is the foundation for developing all frontend projects. Now we need to consider the technology choices for this project.
As we discussed earlier, the “content framework” has an important impact on technology selection. To help you make a better choice, I’ve put together a “technology selection” recommendation table based on content characteristics (static/dynamic).
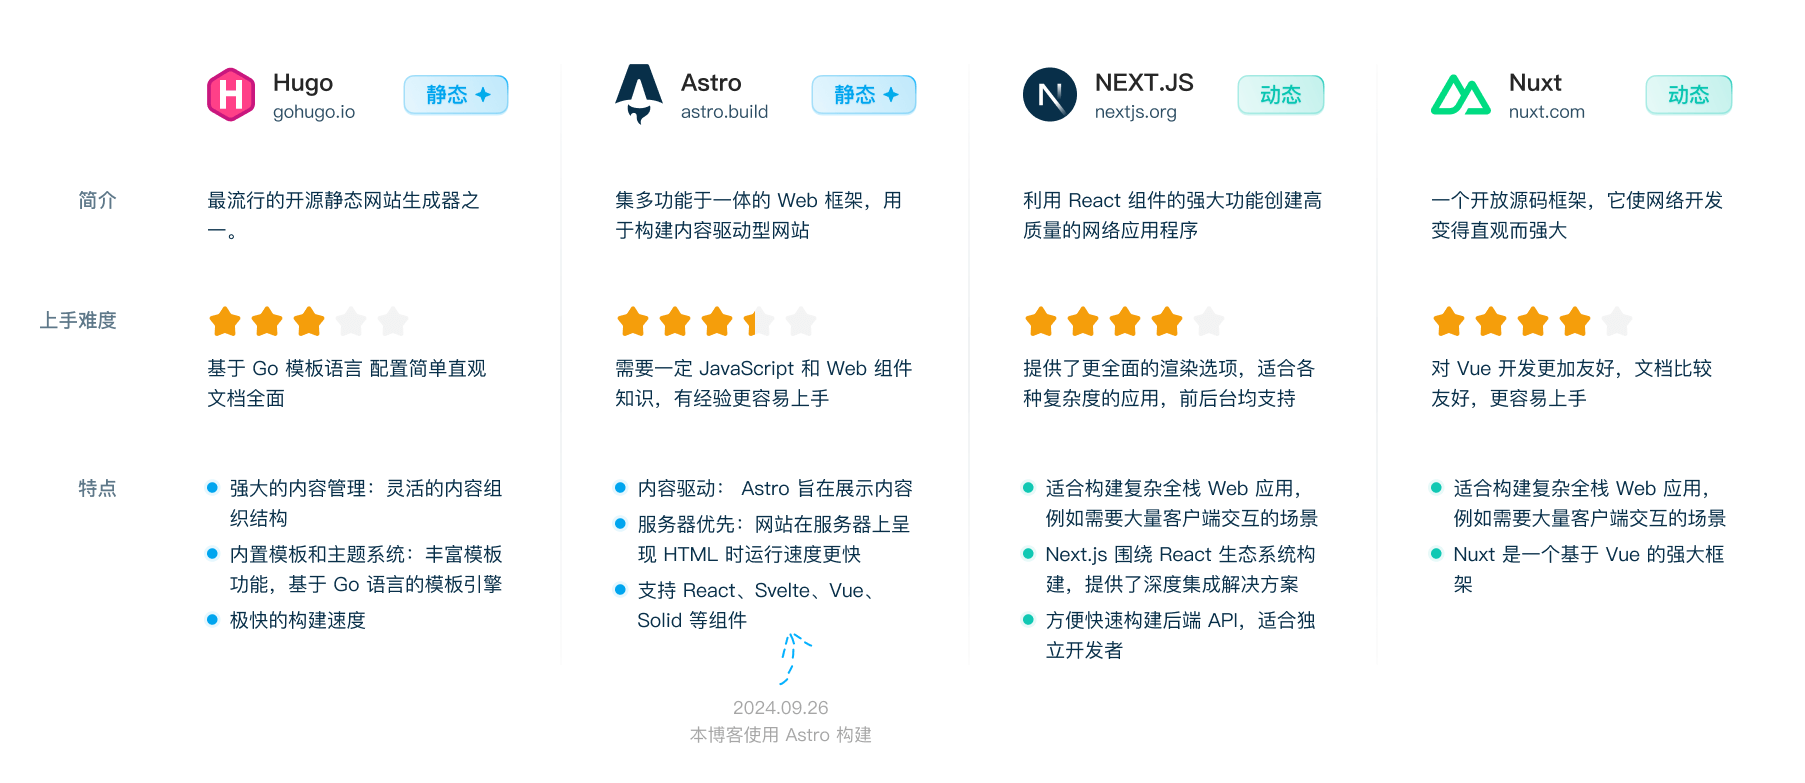
I have used Hugo, Next.js, and Astro from the table, while Nuxt is a strong Vue-based competitor to Next.js. My blog has also gone through changes from Hugo -> Next.js -> Astro, so I suppose that gives me at least a little credibility.
Among these frameworks, Astro is the one I currently recommend most. The specific reasons are as follows:
- Websites built with Astro have excellent performance and load fast enough
- Astro natively supports Markdown, making it very suitable as a blog framework
- Astro has a relatively gentle learning curve and only requires familiarity with HTML, CSS, and JavaScript
- Static builds make it convenient for me to quickly deploy to different platforms later
- The server I purchased has relatively weak performance, and pure static sites have low server requirements
- Static content is also very suitable for CDN acceleration
You can also check the 2023 Web Framework Performance Report, which compares the performance of web frameworks such as Astro and Next.js. It may help you make a choice.
After the environment is configured, taking an Astro project as an example, we can follow the Astro documentation to create a new Astro-based project:
# 如果没有安装 pnpm,npm 请使用 npm create astro@latest
pnpm create astro@latest
Next, you can find some tutorials and learn step by step how to write code based on Astro. It’s not very difficult to get started.
After the project initialization is complete, you may wonder how to connect it with the specifications on the design side. What I’m using is Tailwindcss - A utility-first CSS framework for rapid UI development. It’s like a plugin for the project that can help you with frontend development. In Tailwindcss, you can predefine fonts, theme colors, functional colors, and even spacing, border radius, and so on. At this point, doesn’t it work perfectly with the color and other specifications you defined during design? Configure it once, and it becomes very convenient to use and adjust uniformly.
# 如果没安装 pnpm,npm 请使用 npx astro add tailwind
pnpm astro add tailwind
Tailwindcss configuration example:
/** @type {import('tailwindcss').Config} */
module.exports = {
  darkMode: ['selector'], // 暗黑模式支持
  theme: {
    colors: {
      white: '#ffffff', // 定义颜色名称 调用方式:text-white bg-white
      black: '#000000',
      brand: {
        500: '#0ea5e9', // 定义品牌色 调用方式一致:text-brand-500
        600: '#0284c7',
      },
    },
  },
};
Backend Development
Earlier, we chose Astro as the technology stack, which is more suitable for developing static content. If your blog needs a lot of dynamic data and requires a simple backend, then I recommend using Next.js or Nuxt.
Basic process:
- Have a database (I recommend Supabase’s free plan or a database from a domestic cloud provider) to store your data
- Connect it to your Next.js project through the plugin Prisma
- Write logic code in the project to operate on the data in the database
Here is an example of an API for querying my “recent updates”:
export async function GET(req: NextRequest) {
  // Get 方法
  const number = Number(req.nextUrl.searchParams.get('number')); // 让程序知道你想要几条数据

  const records = await prisma.recent_states.findMany({
    take: number, // 程序知道之后,去数据库对应数量的数据
    orderBy: { created_at: 'desc' }, // 排序方法 按照时间降序
  });

  return Response.json(records); // 返回 json 格式的数据 方便返回到页面中
}
By calling this API using the Get method, I can query my recent updates and then display them on the blog, allowing you to see and understand what has been happening with me recently.
Compared with static content, there are more operations involved. This adds the process of querying and processing data from the database. If database access is slow, or your cloud server performance is poor, this will directly affect your website’s access speed. Also, dynamic content is not suitable for deployment through traditional CDN distribution. If your website’s access speed is poor, you should give up dynamic content.
Deployment and Launch
After the blog has been developed and tested locally, I recommend uploading it to Github. Github is used for online project hosting with Git. This platform is like a version management tool for files, and it can manage the code of your project.
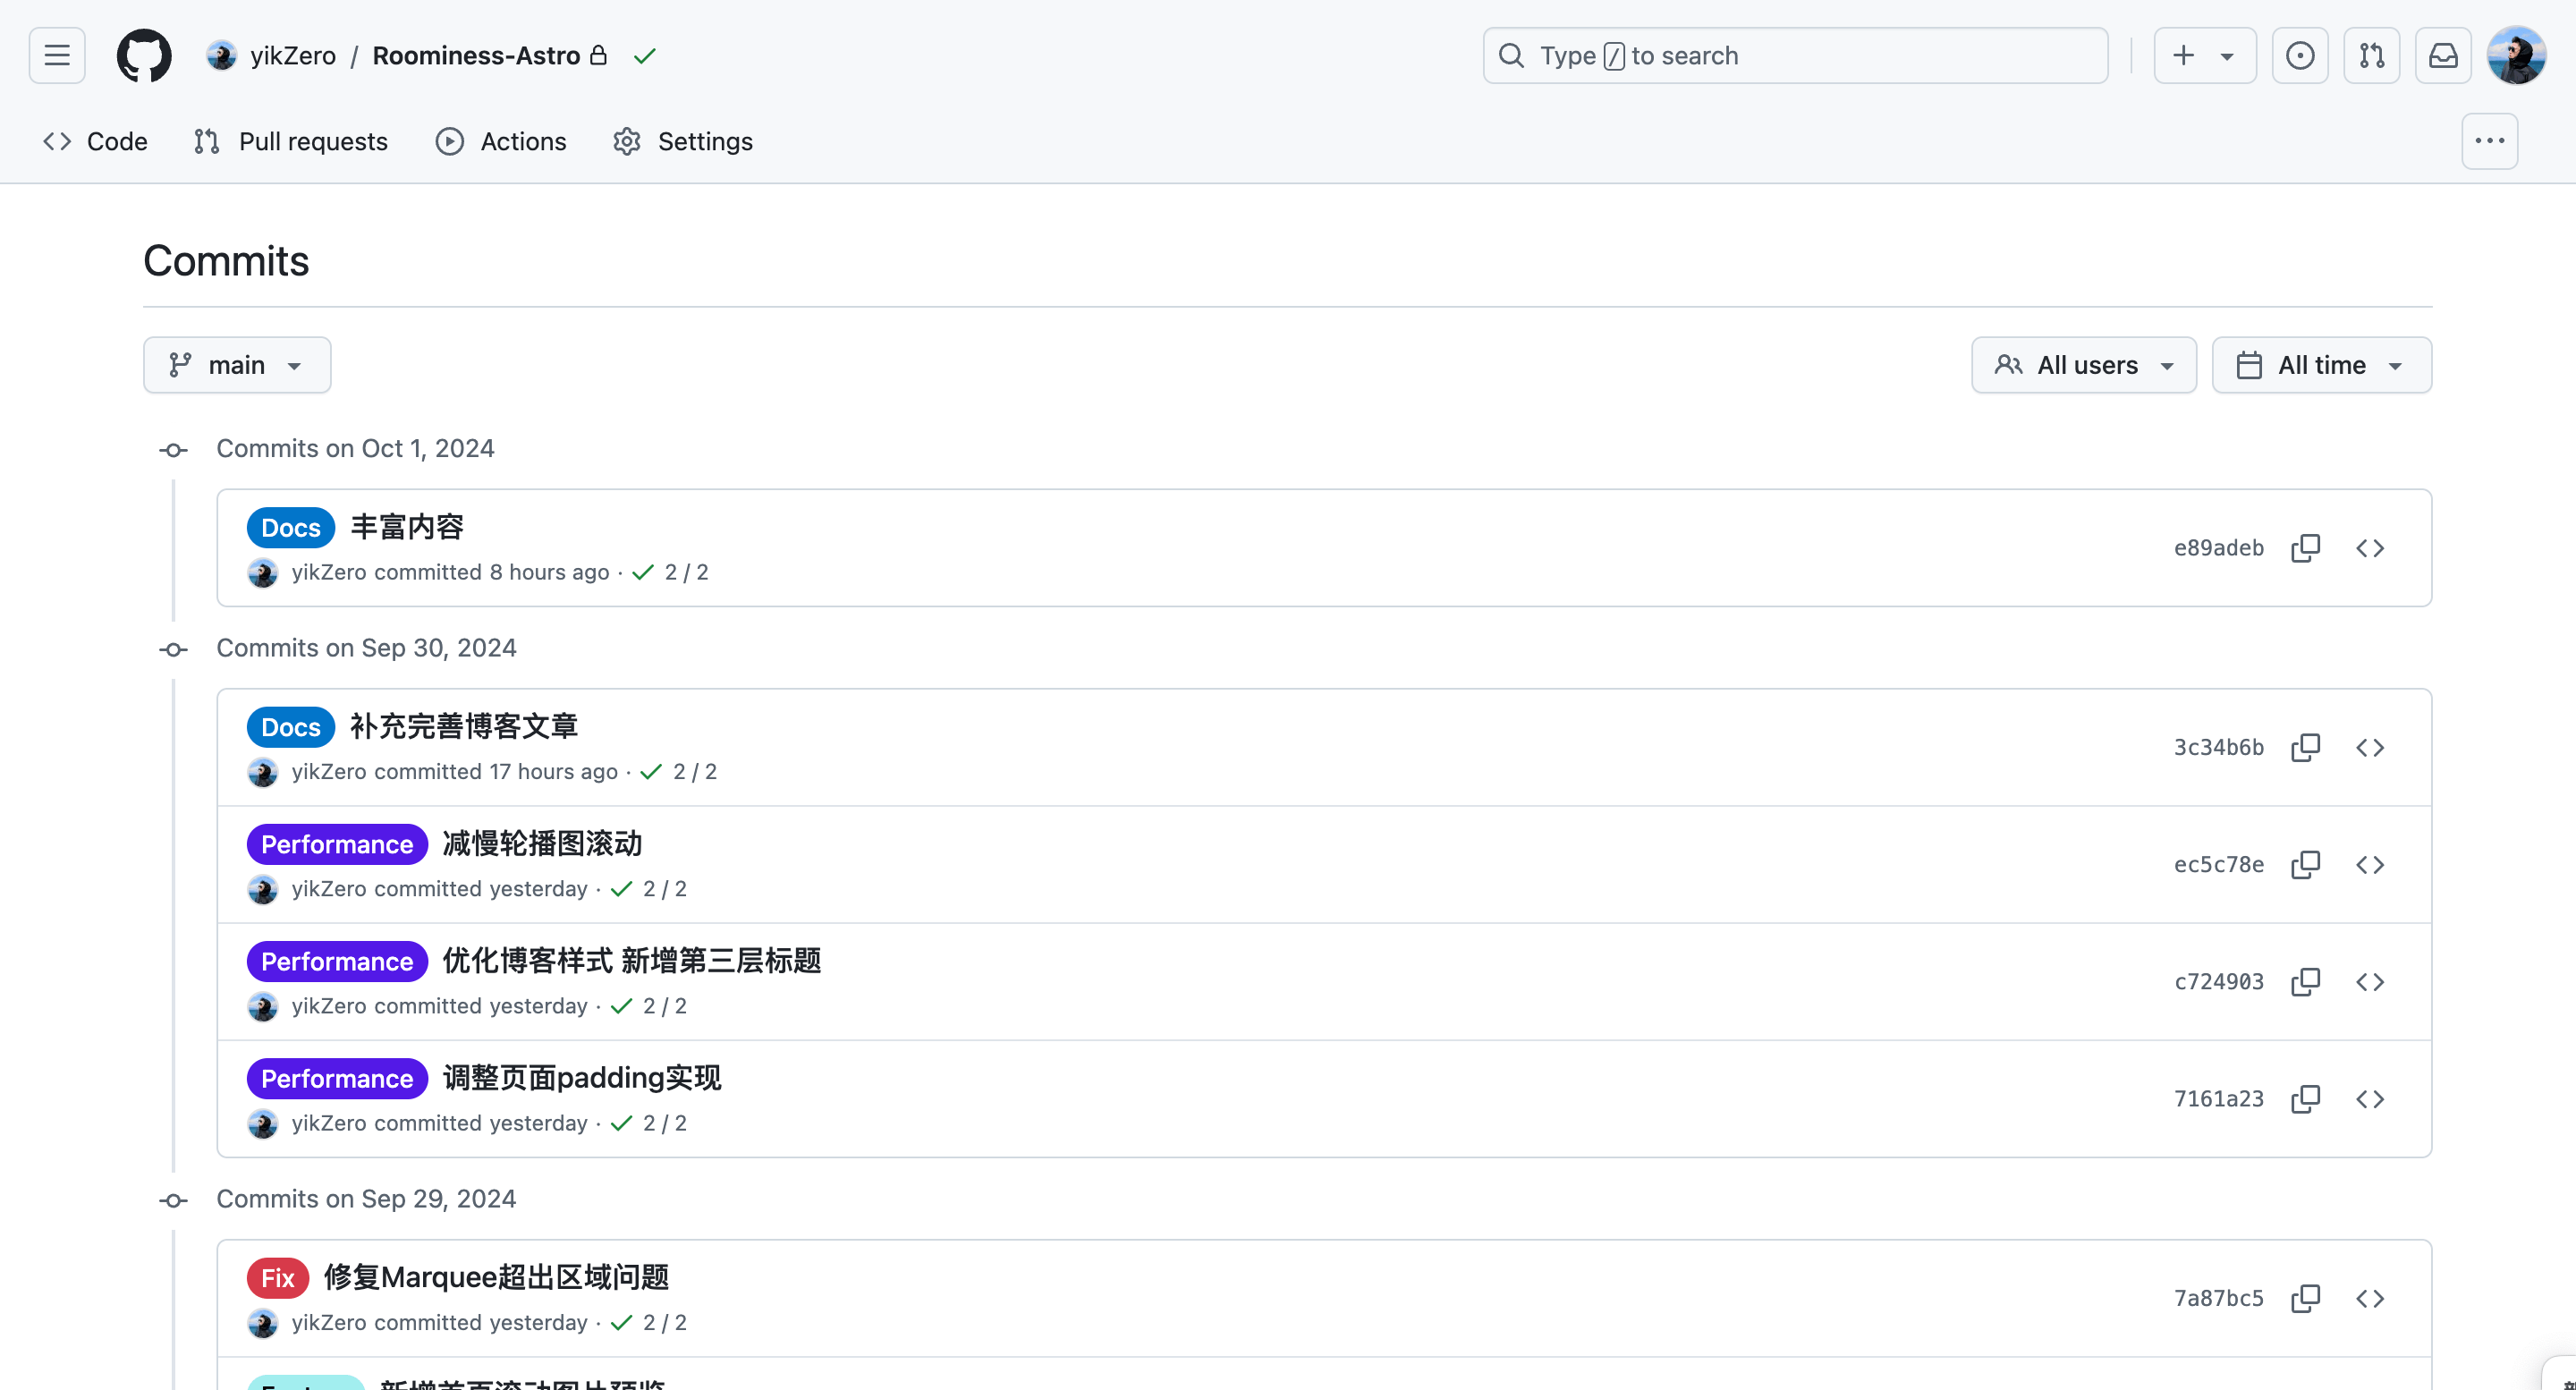
Every time you modify a piece of code, you can commit it to Github. If the project code build has problems at some point, you can roll it back very conveniently.
After the blog is developed, what we mainly want is for others to see it. So we need a place to host the website, and that place also needs to be accessible by everyone. For example: home devices with a public IP, cloud servers, lightweight application servers, PaaS platforms, and so on.
A laptop at home can actually be used as a device to host a website, provided that you have a public IP and others can access you on the Internet. Currently, public IPs need to be requested from customer service. If you use your laptop as a server, your device also cannot be shut down, and so on. There are still some limitations.

So at present, most people mainly deploy websites on cloud servers or lightweight application servers. These all have public IPs and run 24 hours a day, making them very suitable as website servers. If you don’t need very strong performance, devices costing around 99 yuan per year are enough. It’s still quite affordable. If you’re still a student, you can get a free server from Alibaba Cloud.
Taking a cloud server as an example, here is a brief introduction to the process:
- A Linux server, like a macOS system, needs to have the frontend environment installed and configured before building
- If the files are not very large, you can also build locally and then upload the
distpackage to the server - Configure nginx forwarding, and you can access your website through the cloud server’s IP address
- If you don’t want to access it directly through an IP address, you can also purchase your own dedicated domain name. Several major domestic cloud provider platforms allow you to purchase domain names
- After purchasing a domain name, you need to configure DNS resolution. You can handle this step on the platform where you purchased the domain name or on a dedicated DNS resolution platform, such as Dnspod
- Bind the IP address of the A record to the domain name, and then you’ll be able to access your website through the domain name
The above introduces a simple process. If you need a detailed deployment and launch process, you can also refer to Teacher Zuo Zizhen’s article: A Personal Website Building Guide for Designers (Part 1): From Domain Name to Website
If you don’t want to use your own server and only want to design and write code, there are actually many platforms that can handle the server and domain name steps for you. After authorization, these platforms pull your project code from your Github repository, then build and publish it to the web on their cloud platforms.
Similar platforms include Vercel, Zeabur, Cloudflare Page, and so on. If you don’t want to maintain your own cloud server, this is also a good approach.
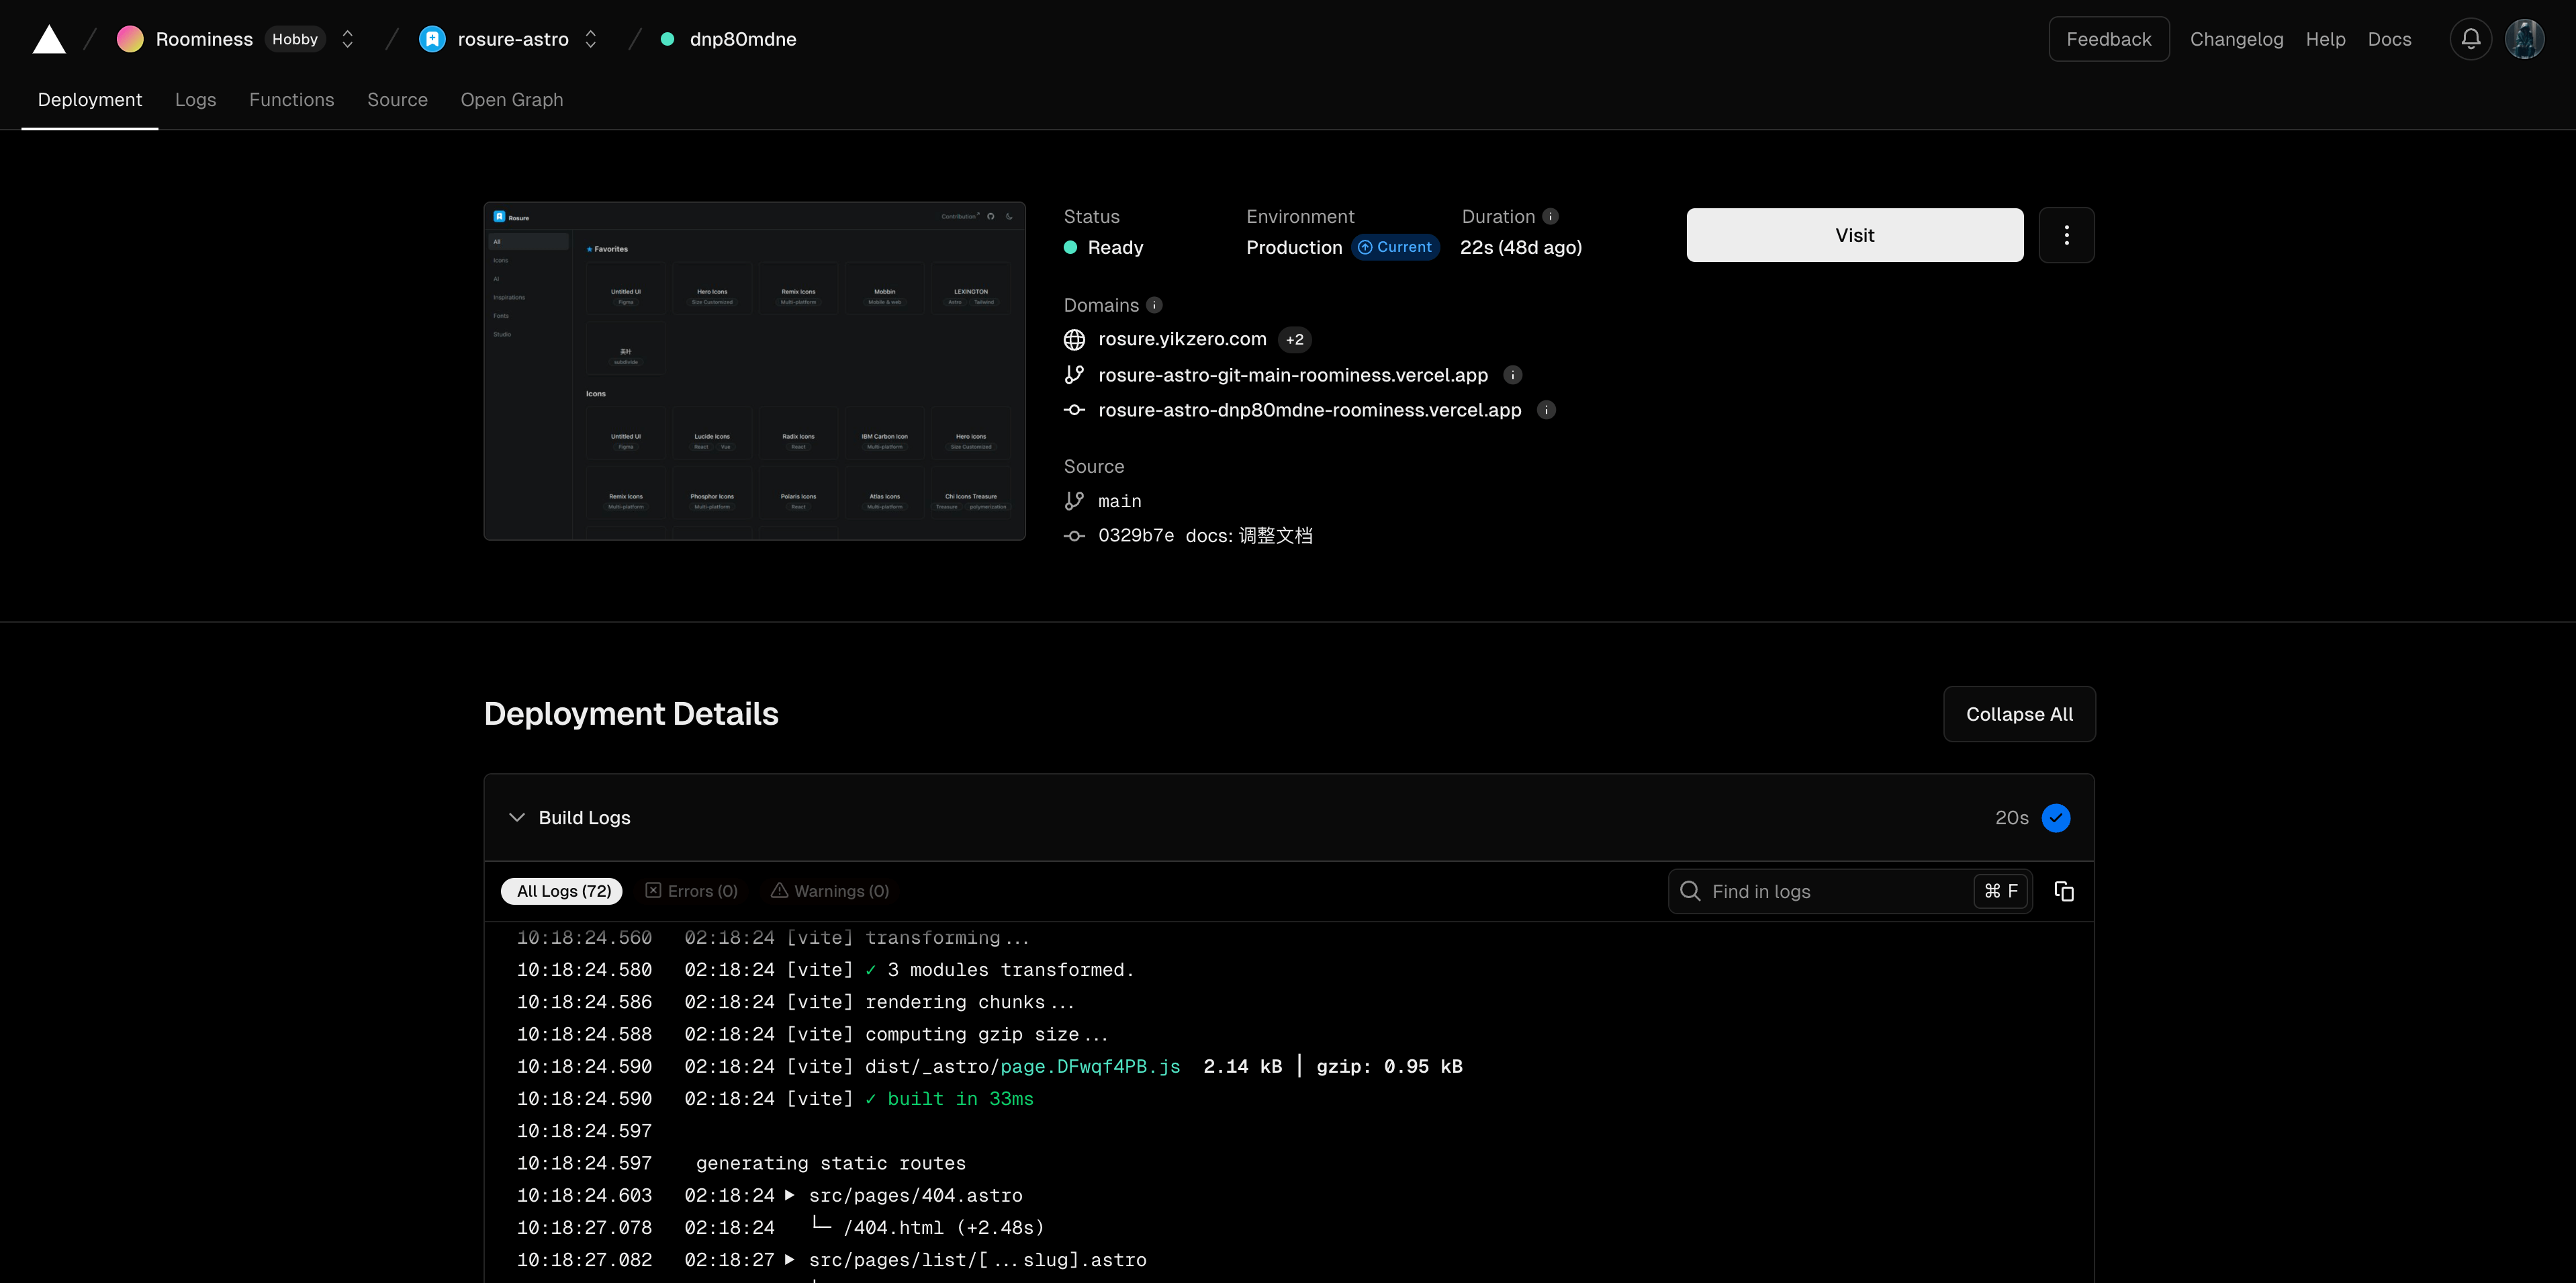
Taking Vercel as an example, here is a brief introduction to the process:
- Create a Github repository and upload your local project code to a private Github repository via Git.
- Register and log in to the Vercel platform, grant the platform permission to read your Github repository, and select the corresponding project repository.
- The project framework is automatically recognized. Click the button to build. The platform will display build logs, so if something goes wrong, you can troubleshoot it in time.
- Once the build is complete, the platform will provide a free subdomain for you to use. You can directly visit the domain name and see that your website has already been published online.
- You can also choose to purchase a domain name, then follow the platform’s prompts to bind the project to the domain name you own.
The above provides two ways to deploy a website to the public Internet. You can choose according to your preferences and the level of difficulty. These two methods can also be combined.
Summary
Due to length limitations, every part of the process has been covered, but not in great detail. You’ll still need to look up more materials on your own. This article can only provide general directional guidance. I hope this introduction to the development process can help you.
Design & Development Tool Recommendations
As everyone may or may not know, I quite like hoarding things, so when it comes to website development, I’ve also collected quite a few useful tools and resources. I’ll take this opportunity to share them with you; perhaps they can help with your development.
Design
| Name | Description | Category | Recommendation |
|---|---|---|---|
| Figma | Collaborative interface design tool | General | ⭐⭐⭐ |
| Rosure (retired) | My design collection, including icons, fonts, website inspiration, and more | Inspiration | ⭐⭐⭐ |
| Toolfolio | Design tools and inspiration aggregator | Inspiration | ⭐⭐⭐⭐ |
| Tailwind CSS Gradient Color Generator | Generates color scales based on the color you provide | Color | ⭐⭐⭐ |
| Palettte | A clear palette editing and remapping tool | Color | ⭐⭐⭐ |
| Radix Colors Custom Palette | Generates color palettes and allows effect previews, with dark mode support | Color | ⭐⭐⭐ |
| Huetone | A tool for creating accessible color systems | Color | ⭐⭐⭐ |
Development
| Name | Description | Category | Recommendation |
|---|---|---|---|
| Homebrew | macOS (or Linux) package manager | General | ⭐⭐⭐ |
| pnpm | Project package manager | General | ⭐⭐⭐ |
| nvm | Node version manager | General | ⭐⭐⭐ |
| Tailwindcss | Utility-first CSS framework | CSS | ⭐⭐⭐⭐ |