HomeLab Environment Setup
Background and Purpose
Home network configuration typically involves an optical modem as the entry point for the ISP connection, an R4S soft router (NanoPi R4S based on OpenWrt), and a Linksys hardware router for managing the internal network. The goal of this article is to optimize network performance through bridge mode, reduce NAT conflicts, and use the R4S and Linksys to achieve efficient network management and wireless coverage.
Topology Diagram
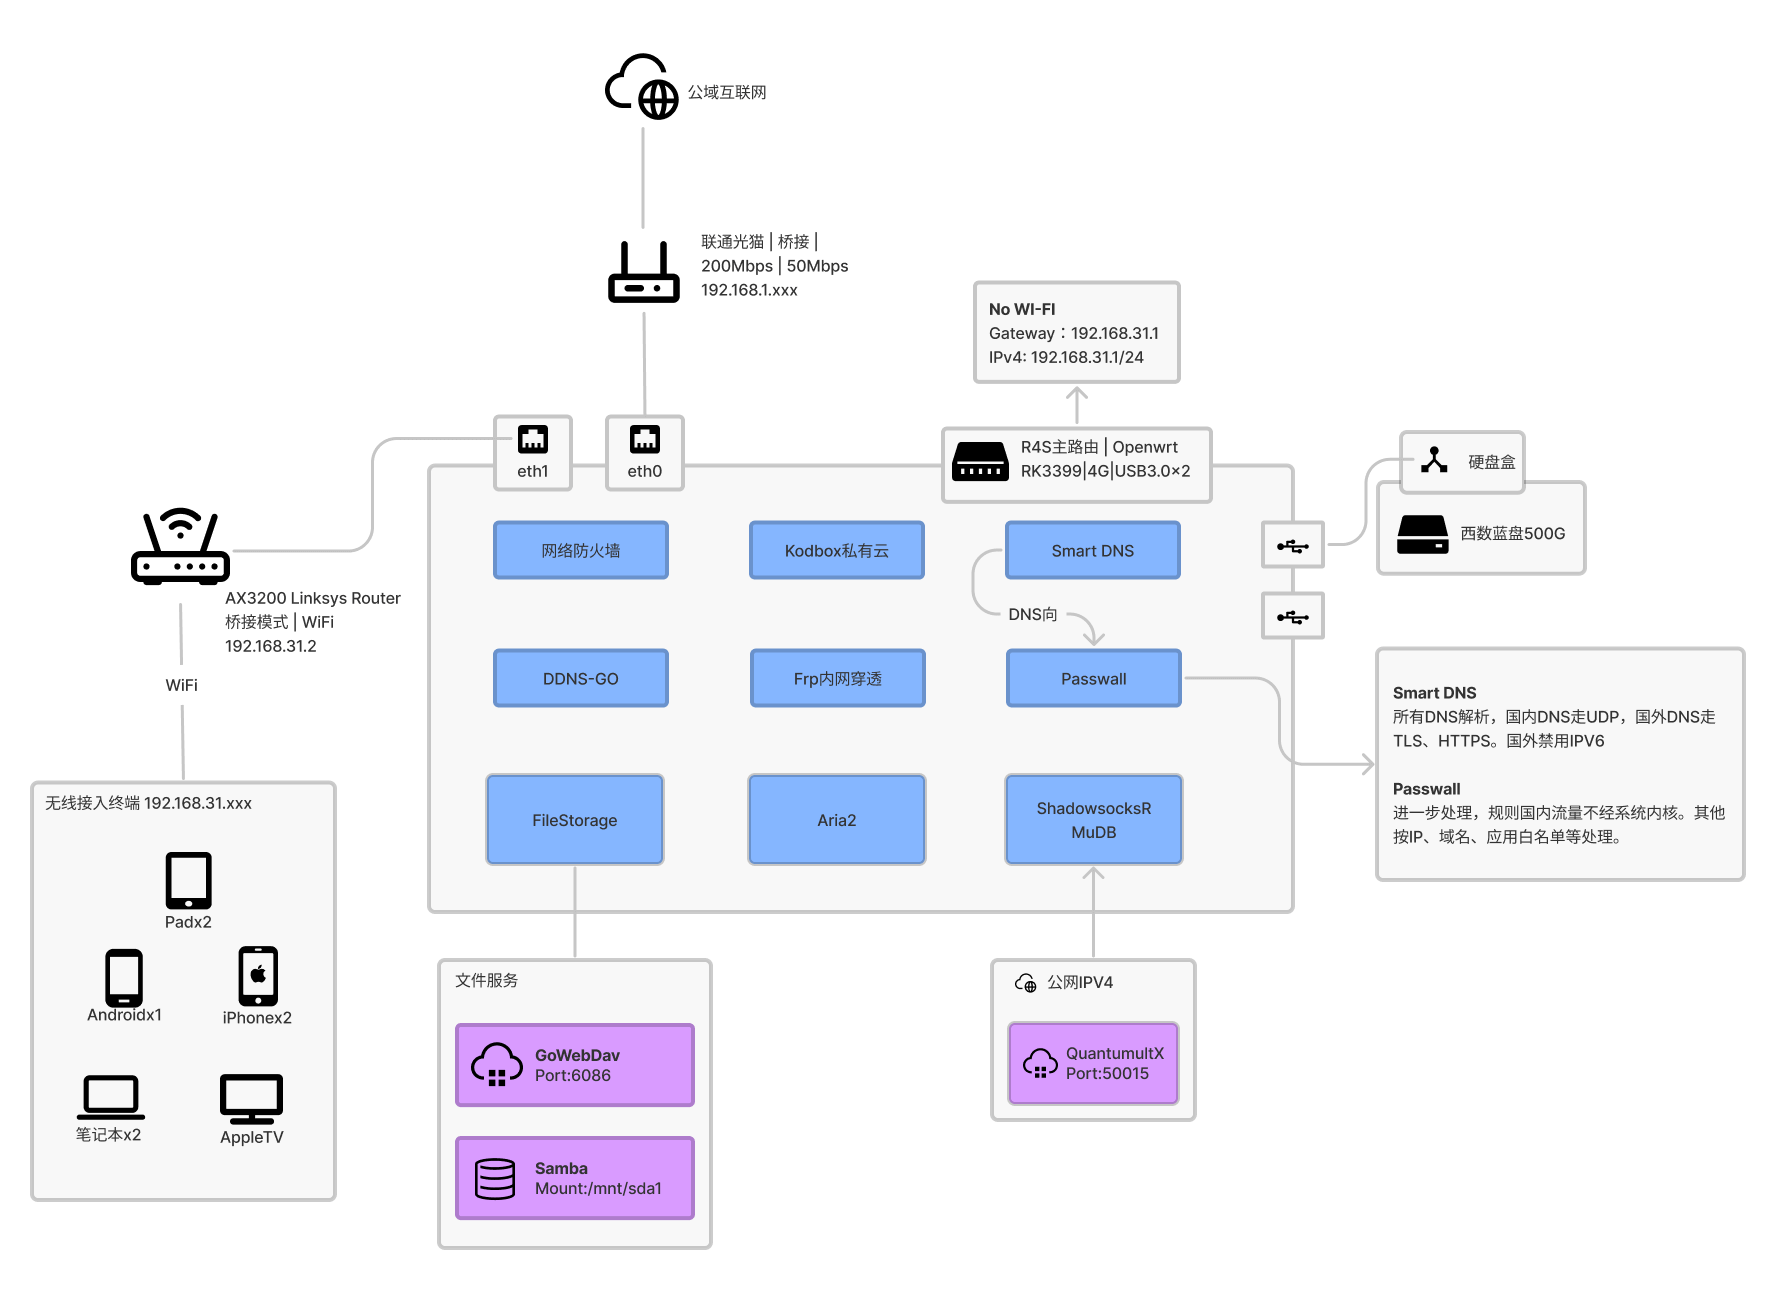
The optical modem in bridge mode connects to the R4S WAN port. The R4S serves as the main router and handles PPPoE. The Linksys connects its WAN port to the R4S LAN port and is set to bridge mode as a wireless access point.
Optical Modem Bridge Configuration
Reasons for Bridging
- Prevent duplicate NAT forwarding and avoid double NAT issues that affect certain applications.
- Reduce the network load on the optical modem; the optical modem is only responsible for optical/electrical signal conversion and does not perform routing.
- The optical modem has limited functionality; after bridging, the R4S or Linksys can provide more powerful routing functions.
- The optical modem’s WiFi signal is weak; after bridging, Linksys can provide better wireless coverage.
Specific Configuration Steps
Hangzhou Unicom Optical Modem
- Login information:
- Address:
http://192.168.1.1/cu.html - Account:
CUAdmin - Password:
CUAdmin
- Address:
- PPPoE settings:
- Account: Usually starts with 0571 (Hangzhou area code); check the backend to obtain it.
- Password: The last six digits of the account.
- Bridge mode settings: Find the WAN settings through the login interface, change the mode to bridge, save, and reboot.
Hangzhou Mobile Optical Modem
- Login information:
- Address:
http://192.168.1.1/ - Account:
CMCCAdmin - Password:
aDm8H%MdA
- Address:
- PPPoE settings:
- Account: Starts with
hz, followed by the initial letters of the district (for example, Binjiang District ishzbj), then followed by a letter from a-z according to the broadband activation order (for example, the first line ishzbja). - Password: Try
000000,888888,123456, the last six digits of the account, or the last six/eight digits of the ID card number.
- Account: Starts with
- Bridge mode settings: After logging in, change WAN to bridge mode, save, and reboot.
Using PPPOE in Bridge Mode
After bridging, the R4S or Linksys needs to dial up using the PPPoE account and password to ensure the Internet connection works properly.
Linksys Bridge Mode
Initial Configuration
Regardless of whether you later want to change it to “Bridge Mode” or “Automatic Configuration - DHCP”, you first need to perform the initial setup. Follow the “Configuration Wizard” to set the router password normally and configure the WiFi password. Without any additional configuration, and as long as the network cable is fine, you should be able to access the Internet normally.
Advanced Settings
Bridge Mode
- Connection: Connect the R4S LAN port to the Linksys WAN port (Internet port).
- Login interface: Access the Linksys web interface (default 192.168.1.1) and skip the initial setup prompts.
- Set bridge mode:
- Go to
Configuration > Connectivity > WAN Setup. - Select
Bridge Modeto use the router as a wireless access point. - Select “Obtain an IP address automatically” or manually specify an IP (such as 192.168.31.2, with the default gateway as 192.168.31.1).
- Save and reboot the router.
- Go to
After setup is complete, click “Save” to reboot the router.
Additional Optimizations
- Wireless Network - Advanced Settings - Roaming Assistant: Select Off to improve stability.
- Wireless Network - Advanced Settings - Region: Select Australia, which may enhance signal strength, but pay attention to compliance; it may not be applicable in all regions.
- If using Homeassistant: It is recommended to disable WiFi dual-band merging mode to avoid compatibility issues.
Summary
This article provides detailed steps for optical modem bridge mode, R4S PPPOE configuration, and Linksys bridge mode to ensure efficient operation of the home network.